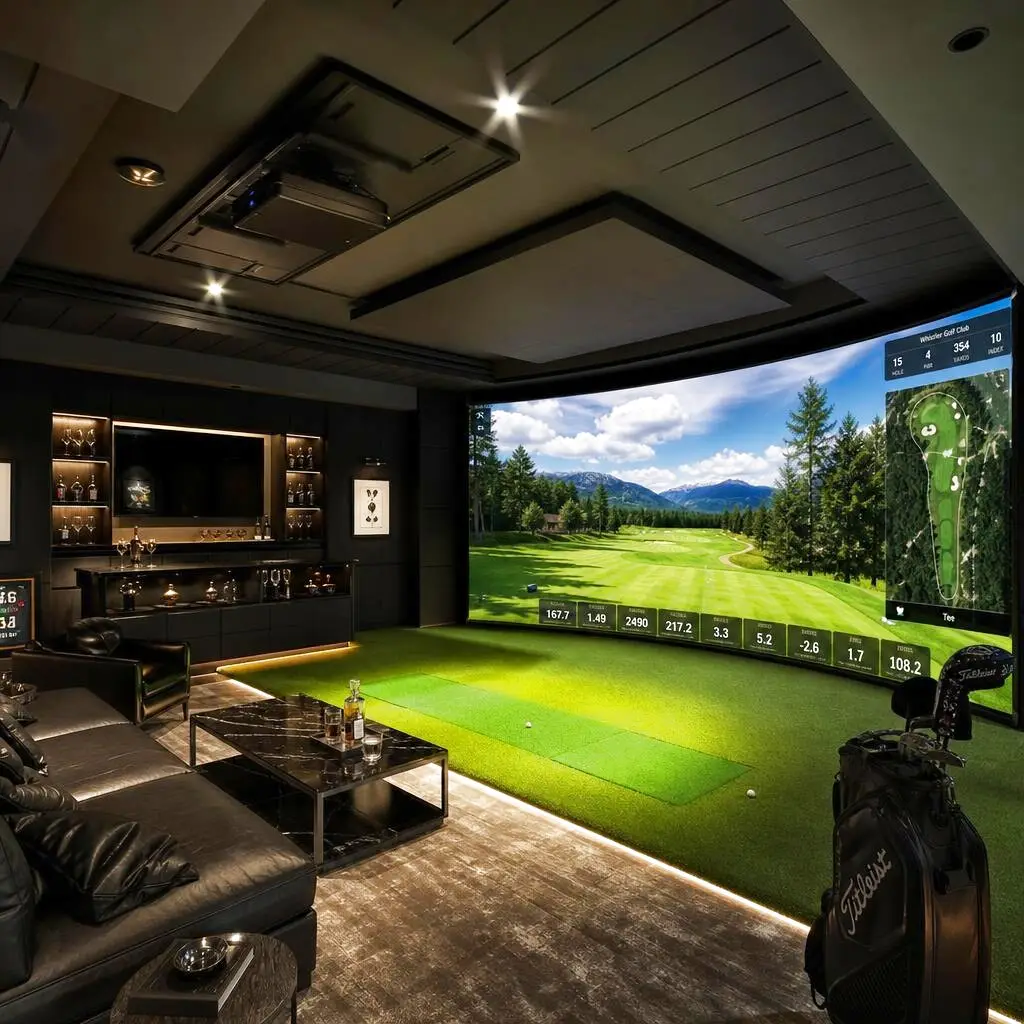
A great home golf simulator room needs, at minimum, about 10 feet of ceiling height, 12 feet of width, and 15+ feet of depth, plus a launch monitor, hitting screen and enclosure, a computer, and a projector — with total budgets typically running $15,000 to $75,000+ depending on equipment and finishes. Ceiling height is the single most important constraint: too low and a full swing won't fit. Here's how to plan the space, choose the specs, and set a realistic budget.
Space Requirements: Get the Dimensions Right First
Before anything else, confirm the room can physically accommodate a full swing. Ceiling height is the make-or-break dimension — most golfers need around 10 feet, and taller players need more. You also need width for a comfortable swing (and ideally to let both right- and left-handed players use it) and depth for the tee-to-screen distance the launch monitor requires.
Golf simulator room dimensions
| Dimension | Minimum | Comfortable | Notes |
|---|---|---|---|
| Ceiling height | 9'6" | 10' – 11' | The critical constraint; verify with a real swing |
| Width | 12' | 14' – 16' | Wider allows both-handed play |
| Depth | 15' | 18' – 20' | Tee-to-screen plus monitor space & safety gap |
How to measure ceiling height correctly
Measure the finished ceiling height — the clearance you'll actually have after flooring, drywall, and any dropped soffits go in — not the raw joist-to-slab dimension. In Utah basements, HVAC trunk lines, plumbing runs, and support beams frequently steal several inches from the usable height, and they're rarely centered where you'd want to swing. If a duct sits directly over the tee line, it can be rerouted during the build, but that's a decision to make early. When ceilings are borderline, positioning the tee under the highest clear span and orienting the swing away from obstructions can recover just enough room.
The Equipment Stack
- Launch monitor: The core sensor that reads ball and club data — the biggest single variable in cost and accuracy.
- Impact screen & enclosure: A high-quality screen and padded enclosure to absorb shots and display the image.
- Projector: Short-throw projectors work best in tight rooms to avoid casting a shadow.
- Hitting mat & turf: A quality mat that mimics real turf and protects joints.
- Computer & software: Runs the simulation, courses, and practice modes.
- Room treatment: Blackout, sound dampening, and dark, non-reflective finishes.
Budget: What Drives the Number
Typical golf simulator budget tiers
| Tier | Total Budget | What You Get |
|---|---|---|
| Entry | $15k – $25k | Solid launch monitor, standard screen/enclosure, basic room prep |
| Mid | $25k – $45k | Premium monitor, quality enclosure, better projector, finished room |
| High-end | $45k – $75k+ | Top-tier tracking, custom millwork, integrated AV, lounge finishes |
The launch monitor typically accounts for the largest share of the equipment budget, while construction and finishes — framing, blackout, sound control, lighting, and any millwork or lounge seating — make up the rest. A basement build often needs framing, insulation, and finishing before the simulator even goes in, which is why a basement conversion and the simulator are frequently planned together.
Launch monitor technology and why it drives the budget
Launch monitors fall into two broad camps: camera-based (photometric) systems that photograph the ball and club at impact, and radar (Doppler) systems that track ball flight. Camera systems generally need less depth behind the ball, which suits tight basements, while radar systems often want more room to see the ball travel. The tier you choose affects not just accuracy but the room itself — depth requirements, mounting locations, and lighting all follow from the monitor. Because it dictates both playability and a large slice of the budget, choose the monitor before you finalize framing and dimensions.
Electrical, HVAC, and structural planning
A simulator room is a small equipment load but a real one: a projector, computer, monitor, and screen lighting want dedicated circuits and clean, hidden wiring, and a comfortable lounge adds outlets and low-voltage runs. Utah basements can run cool, so plan for heating and gentle air movement that won't create glare-inducing dust on the screen. If framing needs to change to reroute a duct or add a soffit for AV, coordinate it with the general build rather than after finishes are in — retrofitting wiring and mechanicals into a finished room is the most common source of avoidable cost.
Room Design That Actually Plays Well
- Lighting: Even, indirect, dimmable light with no glare on the screen — avoid windows or use blackout.
- Finishes: Dark, matte, non-reflective walls and ceiling keep the projected image crisp.
- Sound: Impact noise carries; sound dampening keeps play from disrupting the rest of the home.
- Flooring: A level base for the hitting mat, with turf transitions for a clean look.
- Comfort: Lounge seating, a bar, or a media area turn it into a genuine entertaining space.
Screen, Enclosure, and Safety
The impact screen is the surface you both hit into and project onto, so it does double duty — it has to absorb the force of a well-struck drive night after night while staying flat and taut enough to display a crisp image. Quality screens are woven to take repeated impact without stretching or telegraphing wear, and they're tensioned inside a padded enclosure that catches errant shots and protects the surrounding room. Side and ceiling baffles matter more than most first-timers expect: a mis-hit can rocket sideways, and proper padding keeps drywall, light fixtures, and bystanders safe. In a family basement, that margin of safety is not optional — it's the difference between a room you trust and one you hesitate to use.
Projector placement and image quality
A short-throw projector mounted overhead near the hitting position avoids casting your own shadow on the screen — a constant frustration with long-throw units placed behind the player. Ceiling height again drives the decision: the projector has to clear the swing while still hitting the screen squarely, so its mount is planned alongside the framing. Calibrate brightness and keystone once the room's dark, matte finishes are in, because a projector that looks fine in a bright showroom can wash out or over-saturate in a purpose-built simulator room. Getting placement right the first time avoids re-mounting into finished drywall later.
Mistakes to Avoid
- Buying equipment before checking ceiling height: The most common and costly error — confirm a full swing fits before spending a dollar on gear.
- Under-budgeting the room, not the tech: Framing, blackout, sound control, and finishes often cost as much as the equipment; plan them together.
- Leaving glare unaddressed: Windows, glossy paint, and stray light wash out the projected image and hurt accuracy.
- Skipping sound control near bedrooms: Impact noise carries through floors and walls; dampening is far easier to add during framing.
- Mismatching monitor and room depth: Choosing a radar monitor for a shallow room (or vice versa) forces compromises later.
Why Utah Homeowners Love Them
Utah's long winters make a year-round indoor practice space genuinely useful — you can keep your game sharp from November through spring. Simulator rooms are especially popular in luxury homes around Draper, Park City, and South Jordan, where basements offer the footprint and buyers appreciate a high-end entertaining feature. It's our golf simulator rooms specialty, and it pairs naturally with a media wall or bar for a complete lower-level lounge.
Where the room lands in the home matters too. A finished basement in a Lehi or Salt Lake City home usually offers the depth and privacy a simulator wants, while a converted garage can work when it has the height and can be conditioned against Utah's temperature swings. Because a simulator often anchors an entire entertaining level, many homeowners fold it into a wider lower-level plan alongside a bar, lounge seating, or even a hidden door that opens to the room for a bit of surprise.
Turning It Into a Real Entertaining Room
The simulators homeowners love most are the ones that double as lounges when no one's swinging. Comfortable seating set back from the tee line, a bar or beverage station, warm layered lighting on a separate circuit from the screen lighting, and a media setup let the room host game nights and gatherings, not just practice sessions. Built-in millwork can hide the computer and cabling while giving the space a finished, intentional look. Because the room is often the anchor of a lower level, planning it alongside a wine wall or bar keeps the finishes cohesive and the wiring clean. A room that earns daily and social use — not just the occasional bucket of balls — is the one that justifies its cost.
Planning Your Build
- Measure ceiling height first — it decides whether the room works at all.
- Choose your launch monitor early; it drives depth requirements and budget.
- Plan lighting and finishes for a dark, glare-free environment.
- Coordinate framing, electrical, and AV so wiring is hidden and clean.
- Budget for sound control if the room sits near living or sleeping spaces.