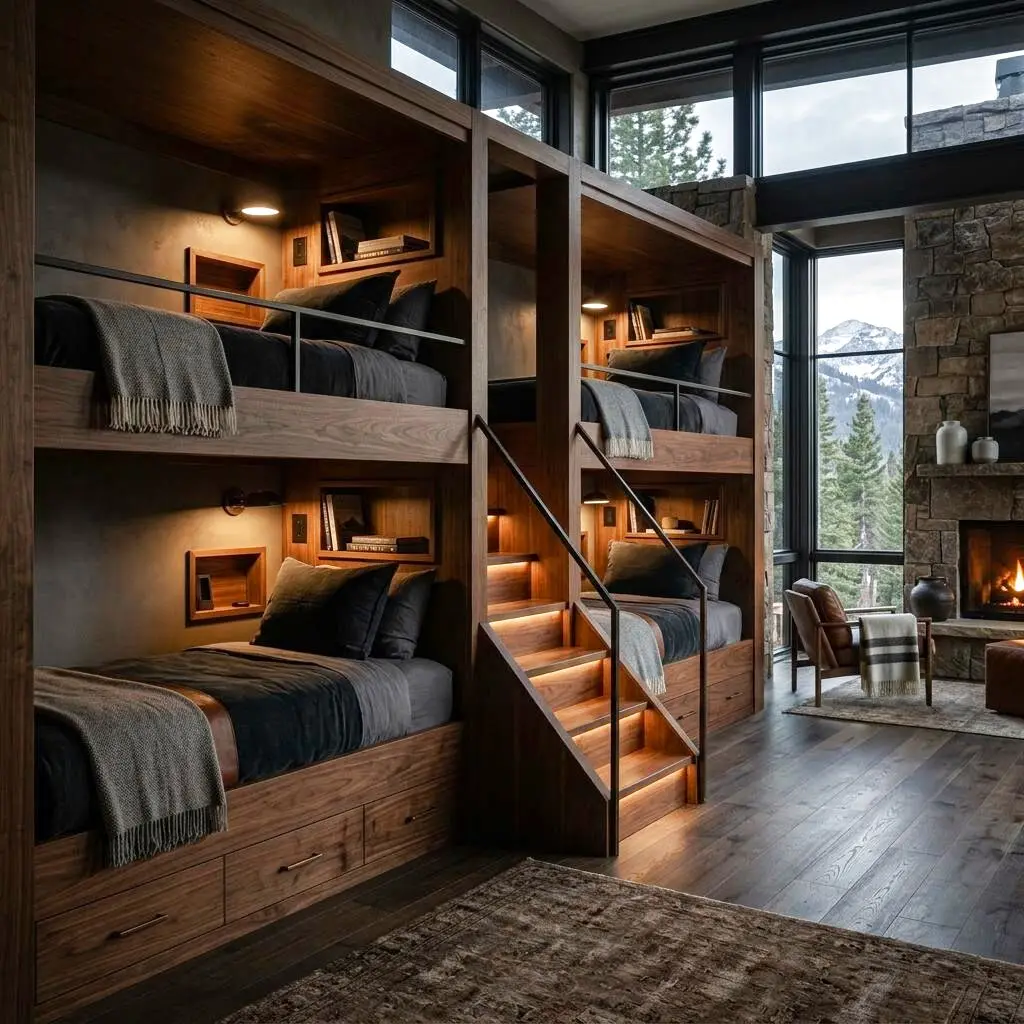
Custom Built-In Bunk Rooms
Sleep more guests in ultimate style.
Service Tiers
The Twin Nook
A beautiful two-bed built-in system perfect for smaller spaces.
- Two built-in beds (twin or full)
- Custom ladder
- Individual reading lights
- Under-bed storage drawers
The Cabin Suite
A classic four-bed setup with premium millwork.
- Four integrated beds
- Built-in staircase with storage
- Individual charging niches
- Premium paint-grade wood
- Integrated guardrails
The Ultimate Bunk Hall
A massive 6+ bed suite with ultra-luxury finishes.
- 6 to 8 bed configurations
- Queen over queen options
- Custom stained wood details
- Privacy curtains
- Integrated HVAC flow
- Hidden storage compartments
Key Benefits
- Maximize sleeping capacity for cabins and large families
- Create a highly sought-after feature for vacation rentals
- Eliminate the clutter of freestanding furniture
- Provide privacy and comfort with dedicated lighting and power
- Add a stunning architectural feature to a spare room
Our Process
Space Design
Determining optimal bed sizes (twin, full, queen) for the room dimensions.
Framing
Building a heavy-duty, squeak-free structural frame.
Electrical
Wiring individual reading lights and outlet niches for each bunk.
Millwork
Applying facing, stairs, drawers, and trim.
Paint & Finish
Flawless painting or staining for a furniture-grade finish.
Cost Guide
Custom built-in bunk rooms run from about $6k for a two-bed nook to $30k or more for a queen-over-queen hall with staircases and privacy curtains. The cost tracks the number of beds, the mattress sizes, and the level of millwork and integrated features. A furniture-grade finish with built-in stairs and individual lighting is a true carpentry project, not a furniture purchase. The estimates below reflect popular Park City cabin and Wasatch vacation-rental builds.
Number and size of beds
Each additional bunk adds framing, facing, and finish; jumping from twin to full or queen mattresses increases lumber and floor space noticeably.
Stairs vs. ladder
Built-in staircases with integrated storage drawers cost more than a ladder but are far safer and add valuable storage — usually a $2k–$5k upgrade.
Electrical integration
Individual reading lights, outlets, and USB niches for each bunk require wiring during framing and add to the finish complexity.
Finish level
Paint-grade poplar is the value choice; stained hardwoods, custom curtains, and detailed trim push toward the top of the range.
Room prep and HVAC
Ensuring conditioned airflow reaches a bunk-packed room and reinforcing the floor for the added weight can add modest cost.
Project Timeline
Space design
1–2 weeksDetermining optimal bed sizes and configuration for the room dimensions and desired sleeping capacity.
Framing
3–5 daysBuilding a heavy-duty, squeak-free structural frame anchored to the walls and floor.
Electrical
1–2 daysWiring individual reading lights and charging niches for each bunk.
Millwork
4–7 daysApplying facing, stairs, drawers, guardrails, and trim.
Paint & finish
2–4 daysFurniture-grade painting or staining for a flawless final result.
Materials & Options
Furniture-grade poplar
A smooth, stable hardwood that takes paint beautifully, poplar is the go-to for crisp built-in bunks that read as fine cabinetry.
Stained knotty alder
For cabin aesthetics, alder brings warm mountain character and hides everyday wear in a busy family or rental room.
Integrated LED reading lights
A dedicated light and switch at each bunk gives every guest control without disturbing the others.
Soft-close storage drawers
Drawers built into the staircase risers reclaim otherwise wasted volume for linens, gear, and luggage.
Blackout privacy curtains
Individual curtains on discreet tracks give each sleeper a private, dark pocket — a detail that elevates a rental listing.
Permits in Utah
A built-in bunk system is generally treated as fixed cabinetry rather than a structural addition, so it usually does not require a building permit on its own. However, the electrical work for the lights, outlets, and charging niches does require an electrical permit and inspection in most Utah cities. If the room lacks a code-compliant egress window and will be used for sleeping, that egress requirement must be met independently. We advise on egress and habitability, pull the electrical permit, and ensure the wiring passes inspection.
Maintenance
- Retighten the structural fasteners once in the first year as the lumber acclimates to prevent any squeaks.
- Check the ladder or stair anchors and guardrails periodically, especially in high-turnover rental rooms.
- Touch up paint or reseal stained surfaces on high-contact edges every couple of years.
- Vacuum the drawer slides and lubricate them so the storage keeps gliding smoothly.
- Launder or spot-clean privacy curtains regularly and confirm the tracks remain firmly mounted.
Common Mistakes to Avoid
Building bunks that squeak
Under-fastened or improperly braced frames flex with movement, and squeaking bunks are a top complaint that hurts vacation-rental reviews.
Choosing ladders over stairs for kids
Ladders are harder for young children to climb safely at night, and they waste the storage that stair risers could provide.
Skipping individual lighting and outlets
Without a personal light and charging spot, guests fumble in the dark and the room feels far less premium than it looks.
Ignoring guardrail height on upper bunks
Too-low rails on upper bunks are a genuine fall hazard, particularly with children and elevated queen configurations.
Related Services
Frequently Asked Questions
Request an Estimate
Tell us about your custom built-in bunk rooms project.